
Lesson 3.4
Another Graph for String Reconstruction
Watch the lectureDe Bruijn Graphs
Gluing nodes and de Bruijn graphs
Let’s again represent the genome TAATGCCATGGGATGTT as a sequence of its 3-mers:
TAA AAT ATG TGC GCC CCA CAT ATG TGG GGG GGA GAT ATG TGT GTT
This time, instead of assigning these 3-mers to nodes, we will assign them to edges, as shown in the figure below.

Figure: Genome TAATGCCATGGGATGTT represented as a path, with edges (rather than nodes) labeled by 3-mers.
You can once again reconstruct the genome by following this path from left to right, adding one new nucleotide at each step. Since each pair of consecutive edges represents consecutive 3-mers that overlap in two nucleotides, we will label each node of this graph with a 2-mer representing the overlapping nucleotides shared by the edges on either side of the node. For example, the node with incoming edge CAT and outgoing edge ATG is labeled AT.

Figure: Genome TAATGCCATGGGATGTT represented as a path with edges (rather than nodes) labeled by 3-mers and nodes labeled by 2-mers.
Nothing seems new here until we start gluing identically labeled nodes. In the figure below, we bring the three AT nodes closer and closer to each other until they have been glued into a single node.
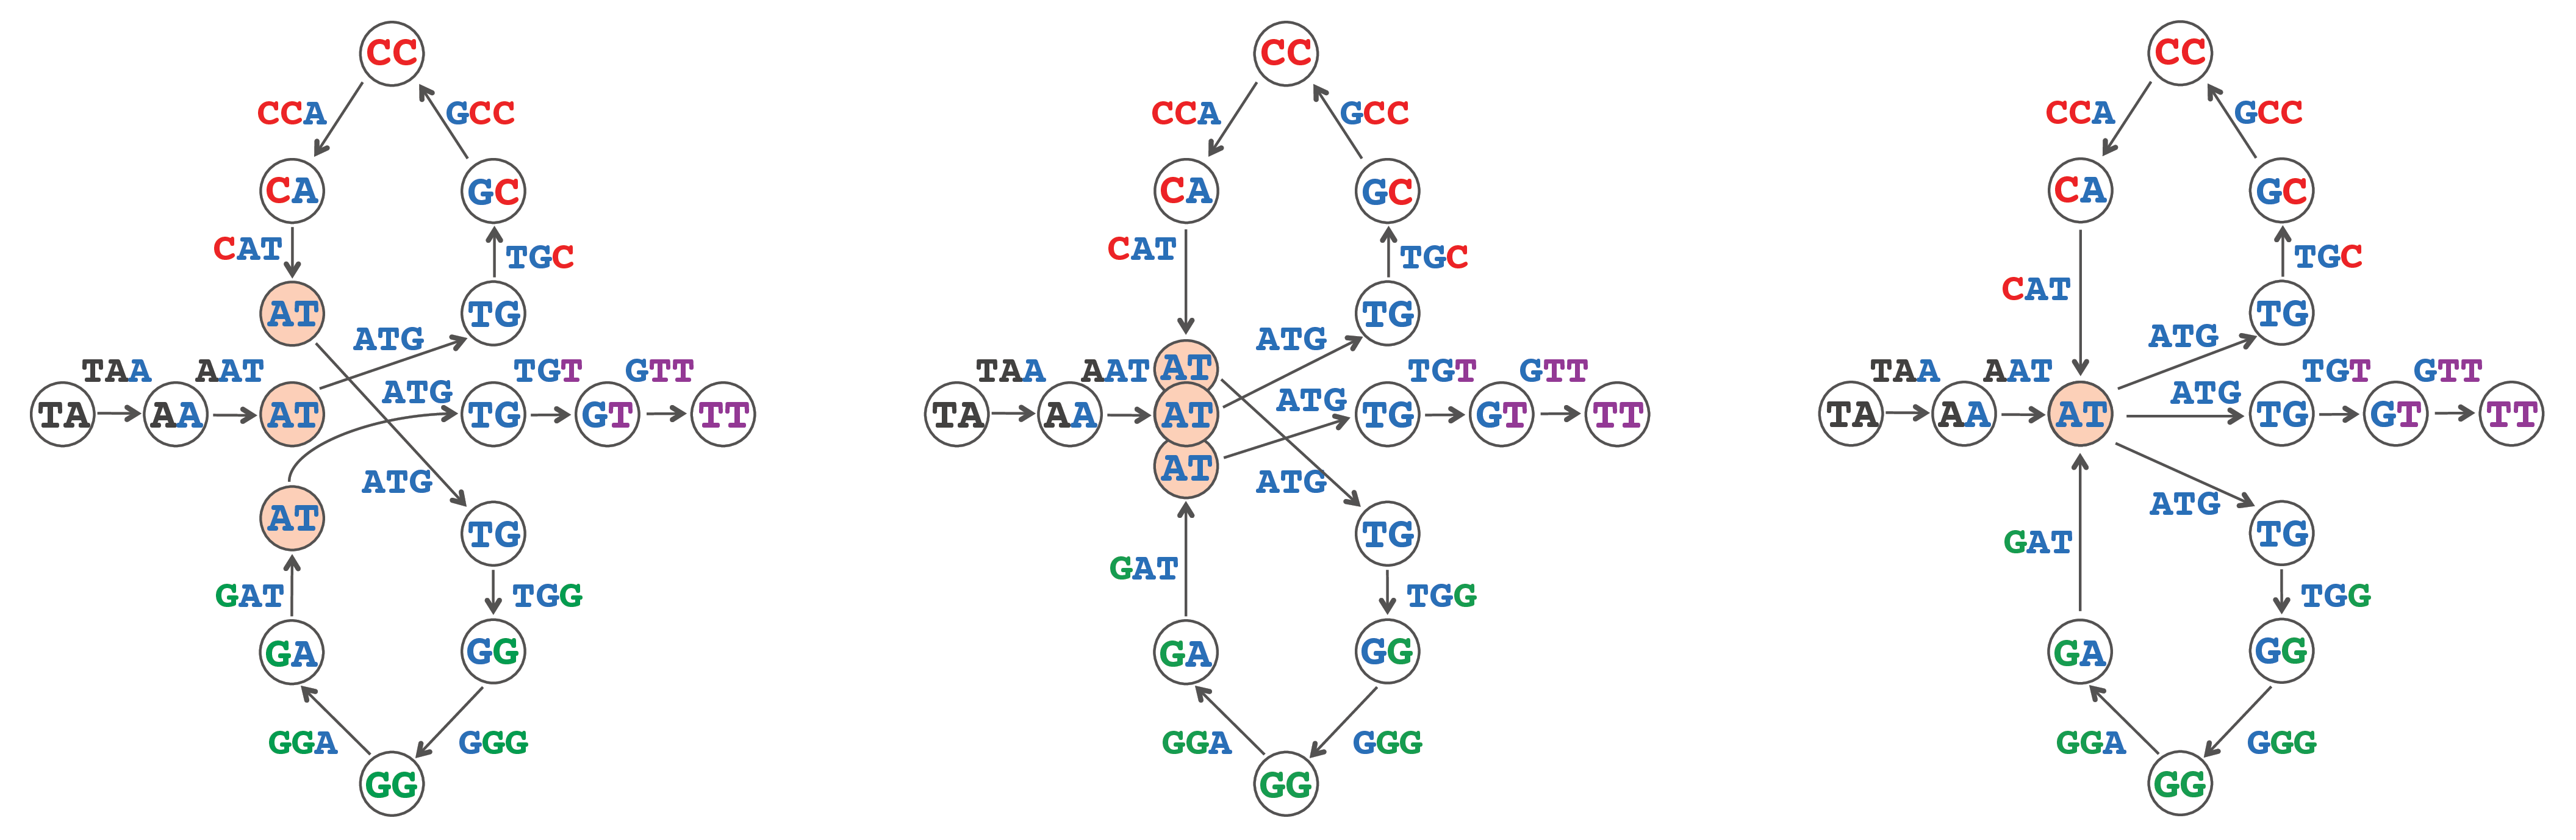
Figure: Bringing the three nodes labeled AT closer (left) and closer (middle) to each other to eventually glue them into a single node (right). The path with sixteen nodes from the previous step has been transformed into a graph with fourteen nodes.
Note that there are also three nodes labeled by TG, which we bring closer and closer to each other in the figure below until they are glued into a single node.
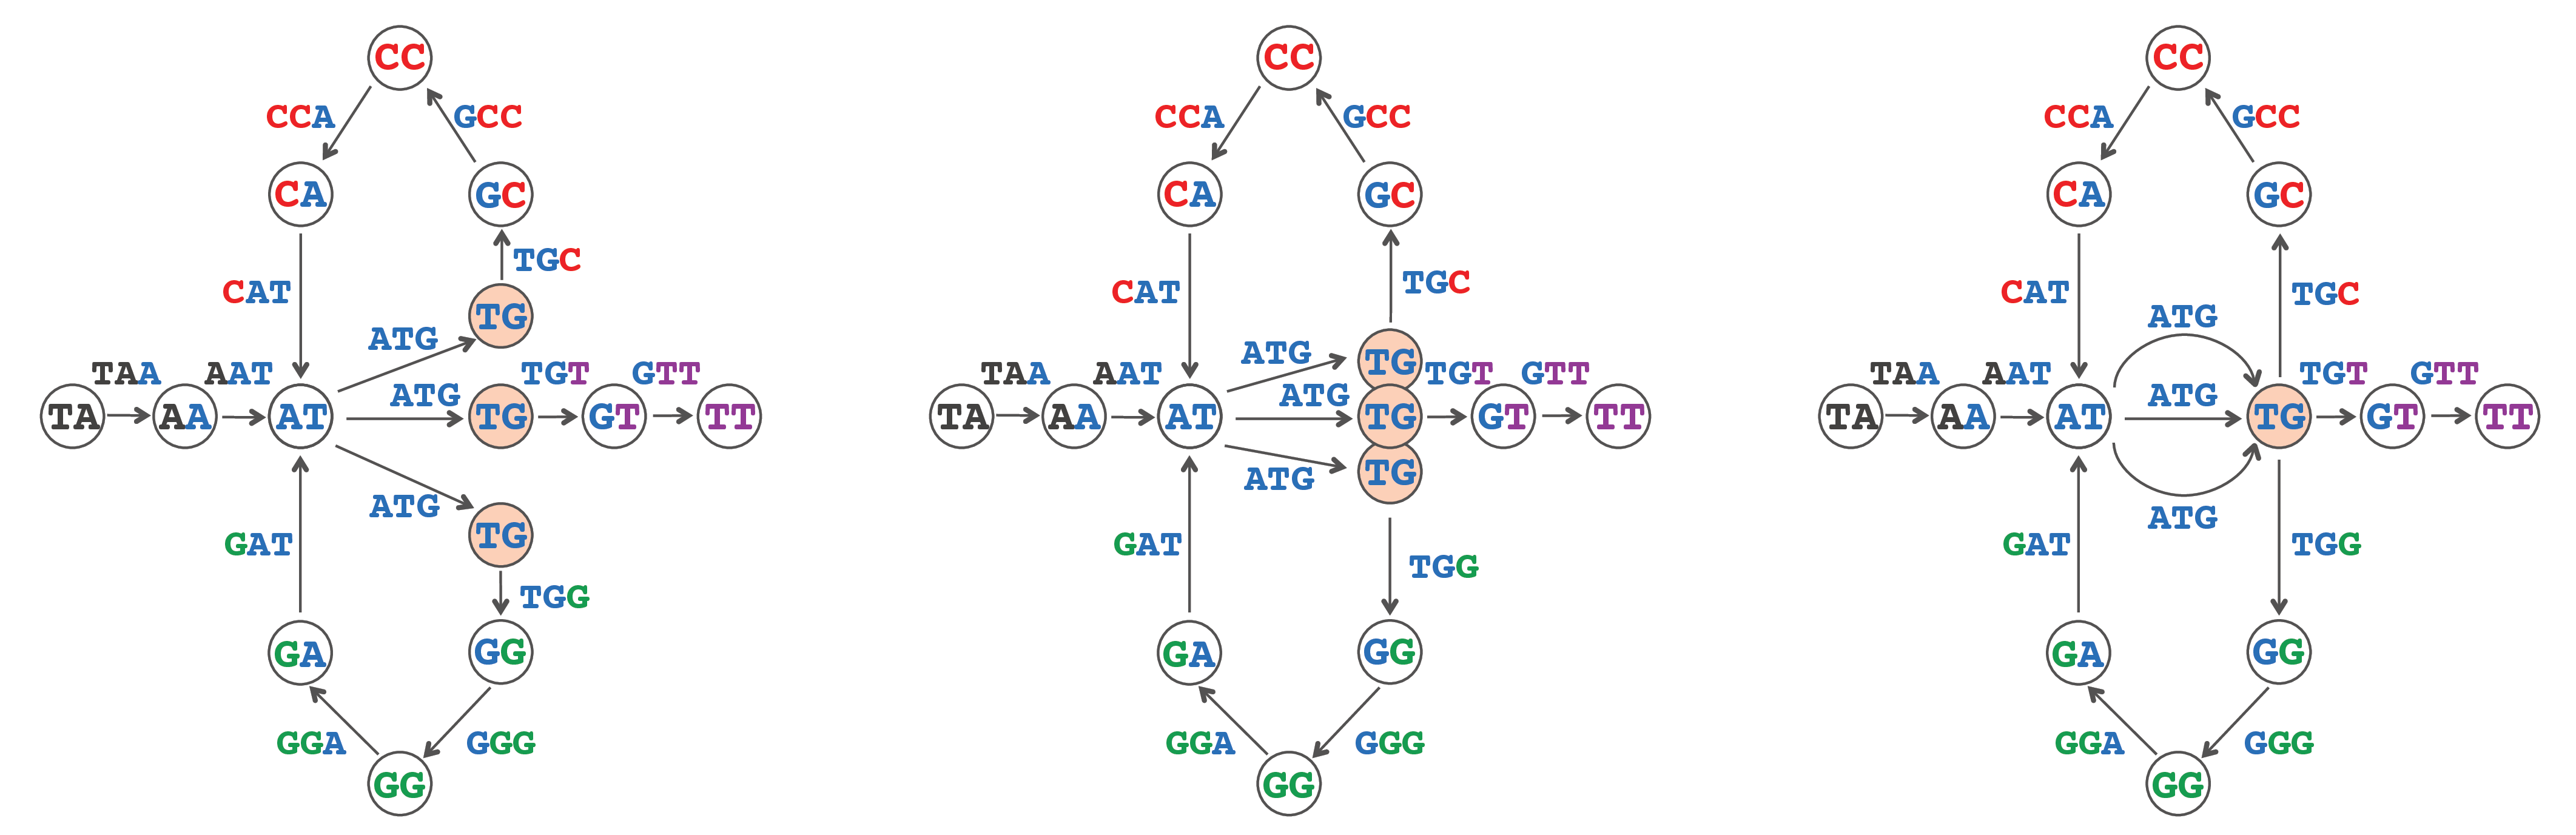
Figure: Bringing the three nodes labeled TG closer (left) and closer (middle) to each other to eventually glue them into a single node (right). The path with 16 nodes has been transformed into a graph with twelve nodes.
Finally, we glue together the two nodes labeled GG (GG and GG), which produces a special type of edge called a loop connecting GG to itself. The number of nodes in the resulting graph (shown on the right below) has reduced from sixteen to eleven, while the number of edges stayed the same. This graph is called the de Bruijn graph of TAATGCCATGGGATGTT, denoted DeBruijn3( TAATGCCATGGGATGTT). Note that the de Bruijn graph below has three different edges connecting AT to TG (representing three copies of the repeat ATG).
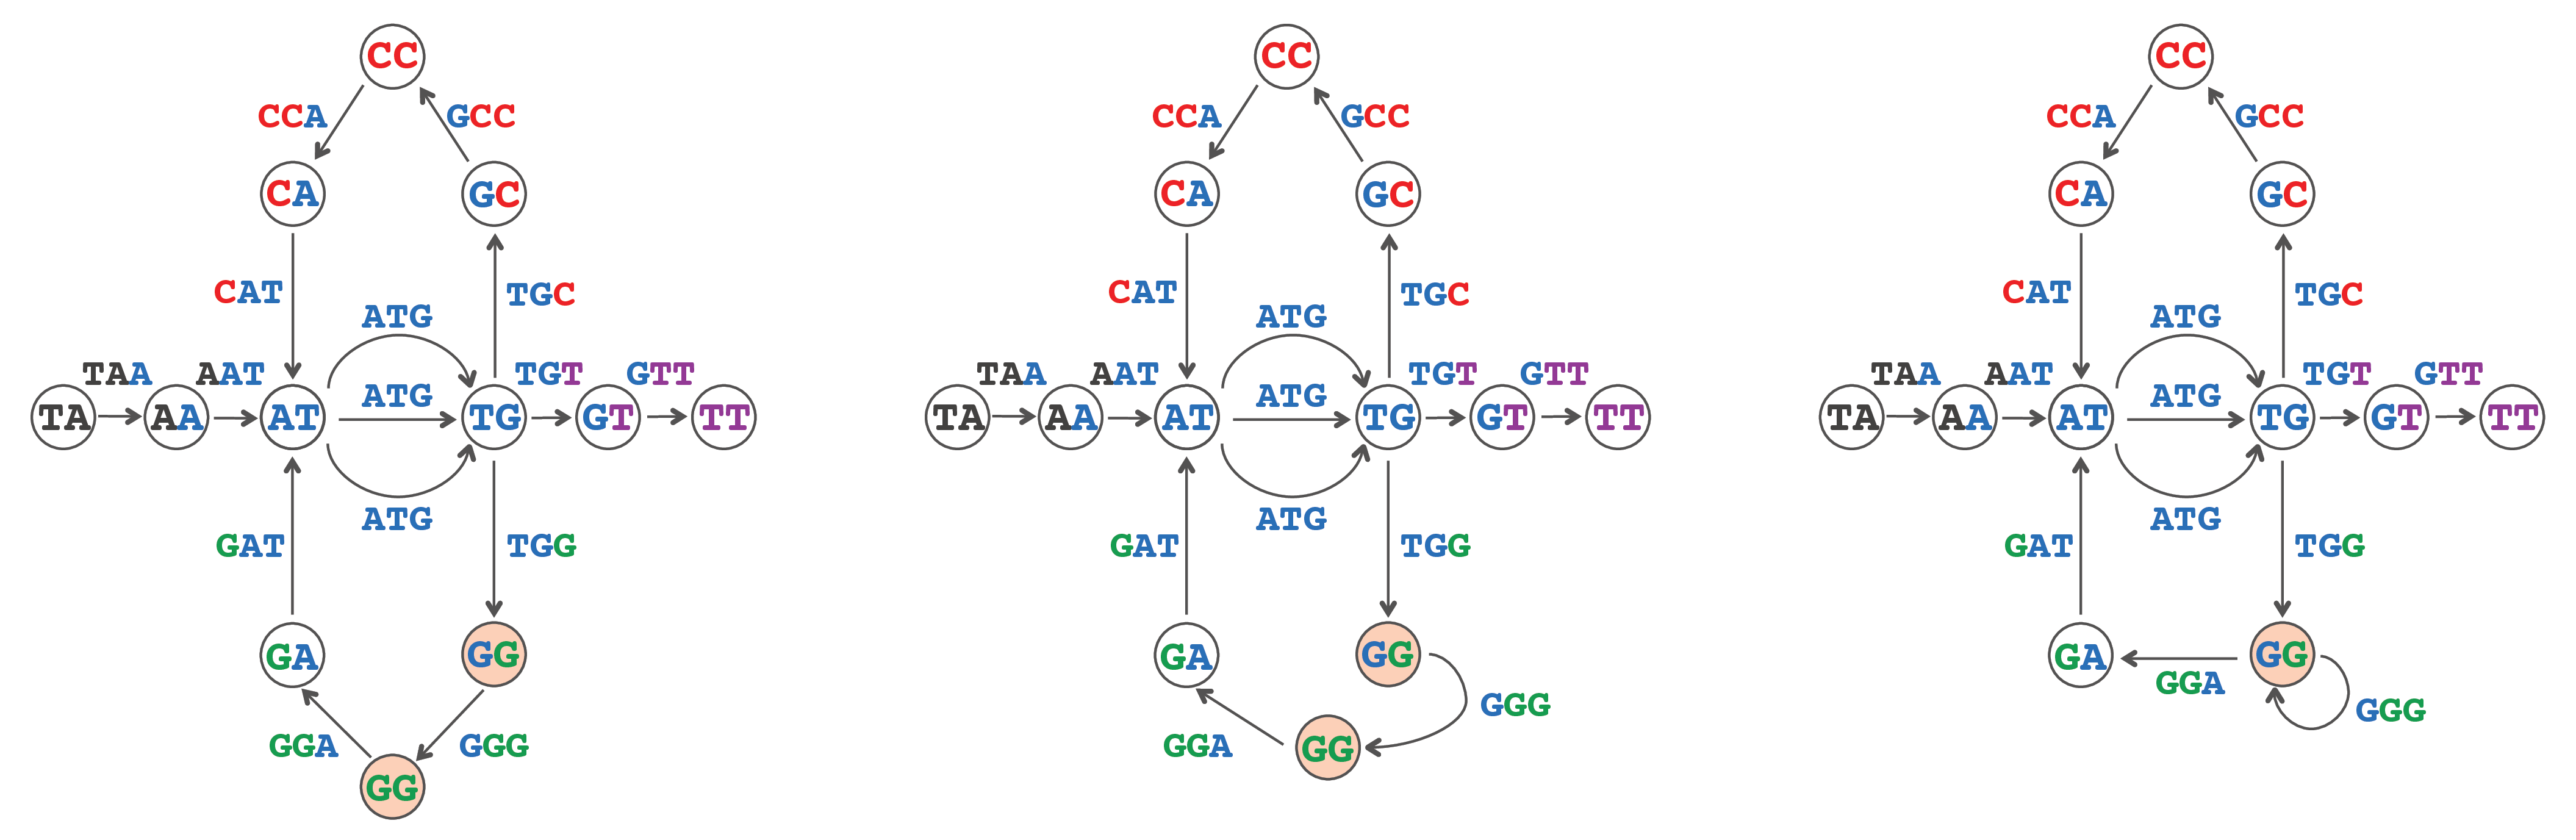
Figure: Bringing the two nodes labeled GG closer (left) and closer (middle) to each other to eventually glue them into a single node (right). The path with sixteen nodes has been transformed into the graph DeBruijn3(TAATGCCATGGGATGTT), which has eleven nodes.
In general, given a genome Text, PathGraphk(Text) is the path consisting of |Text| - k + 1 edges, where the i-th edge of this path is labeled by the i-th k-mer in Text and the i-th node of the path is labeled by the i-th (k - 1)-mer in Text. The de Bruijn graph DeBruijnk(Text) is formed by gluing identically labeled nodes in PathGraphk(Text).
De Bruijn Graph from a String Problem: Construct the de Bruijn graph of a string.
- Input: An integer k and a string Text.
- Output: DeBruijnk(Text).
Note: To see how gluing affects the adjacency matrix and adjacency list, check out "Charging Station: The Effect of Gluing on the Adjacency Matrix and Adjacency List" in the print companion or at Cogniterra.
Code Challenge Solve the De Bruijn Graph from a String Problem. (Solve on Cogniterra or Rosalind.)Solve it with the autograderFree to start in the interactive text
- Input: An integer k and a string Text.
- Output: DeBruijnk(Text), in the form of an adjacency list.
STOP and Think Consider the following questions.
- If we gave you the de Bruijn graph DeBruijnk(Text) without giving you Text, could you reconstruct Text?
- Construct the de Bruijn graphs DeBruijn2(TAATGCCATGGGATGTT), DeBruijn3(TAATGCCATGGGATGTT), and DeBruijn4(TAATGCCATGGGATGTT). What do you notice?
- How does the graph DeBruijn3(TAATGCCATGGGATGTT) compare to DeBruijn3(TAATGGGATGCCATGTT)?